TM 9-2350-261-20-2
INSTALL
NOTE
If installing new generator, begin with
step 17. If not installing new generator, go
to step 20.
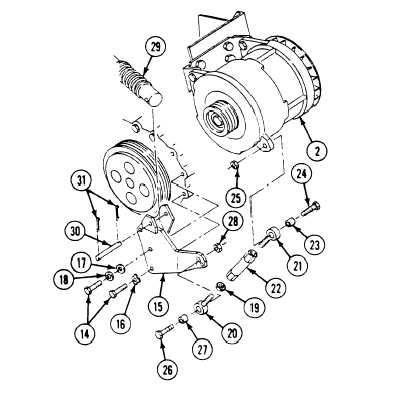
17. Install generator mounting bracket (1) on
generator (2). Secure with two screws (3),
washers (4), and new locknuts (5). Do not
tighten.
18. Install key (6) in generator shaft (7).
NOTE
Position pulley as close to the generator
body as possible. Tighten three screws
(10) alternately and progressively until
they are pulled up tight.
19.
20.
21.
Install bushing (8) and pulley (9) on
generator shaft (7). Secure with three
screws (lo) .
Place generator (2) and mounting bracket
(1) on right side sponson in engine
compartment.
Support generator (2) with 2-inch x 4-inch
x 3-foot wood block and align slotted holes
in generator mounting bracket with holes in
fuel falter bracket (11). Secure with four
washers (12) and screws (13). Do not
tighten screws.
22.
23,
24.
25.
26.
27,
Coat threads of three screws (14) with anti-
seize compound.
Install bracket (15) on transfer gearcase.
Secure with two new key washers (16), flat
washer (17), new lockwasher (18) and three
screws (14). Tighten screws to 144–192
lb-in (16-22 N.m) torque. Use torque
wrench and socket wrench set. Bend tabs on
key washers.
Place jam nut (19) on rod end (20).
Assemble rod ends (20, 21) in turnbuck-
le (22). Do not tighten jam nut.
Install turnbuckle rod end (21) on generator
(2). Secure with spacer (23), screw (24), and
new locknut (25).
Secure rod end (20) to bracket (15) with
screw (26), spacer (27 ), and new locknut
(28) .
Assemble fan drive tensioner (29) and
install on bracket (15). Secure with pin (30)
and two new cotter pins (31).
9-36
Change 1