TM 9-2350-261-34
R E P A I R
N O T E
The materials used to make a cement
patch are adhesive, round patch of vinyl
coated nylon cloth, roller, board, wire
brush, and soft bristle brush.
9.
10.
11.
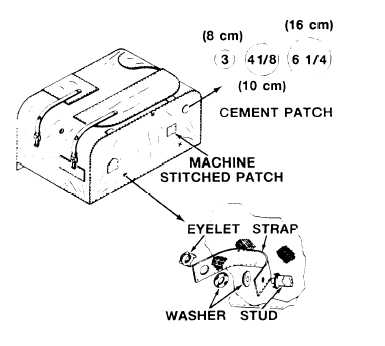
Select a patch that overlaps damaged area
with a margin of at least 3/4 inch (19 mm)
on all sides.
Place board under damaged area
working surface.
Buff patch and damaged area of
wire brush.
for a flat
fabric with
with your skin.
W A R N I N G
Adhesive is flammable and
can injure you. Keep it
away from heat, sparks,
and open flame. Avoid re-
peated or prolonged breath-
ing of vapors. Avoid contact
12.
13.
14.
15.
16.
17.
Center patch over damaged area. Apply
adhesive to patch and batch edge, making
a circle on fabric with soft bristle brush.
Lift patch and apply adhesive to area of
fabric inside adhesive circle.
Allow adhesive to dry until tacky (about
10 minutes).
Press cemented surfaces together firmly with
roller while tacky.
Seal by wiping edge of batch with soft
bristle brush.
Repair webbing using machine stitching as
shown below. Install webbing in a square
pattern with diagonal stitches from corner
to corner.
18. Repair hardware as shown in the following
figure. See FM 10-16 for installation of
eyelets and studs with washers.
N O T E
Use lock stitching when you install
patches, flaps, and straps or repair open
seams.
Use a polyester thread and
smallest needle you can to make weather-
proof seams. Allow 5 to 7 stitches per inch
(3 cm). Backstitch all thread breaks at
least 1 inch (3 cm). Backstitch all ends at
least 1 inch (3 cm), except where ends are
turned under in a hem or seam or held
down by other stitching. Maintain thread
tension so stitching is tight and lock is
fixed firmly in center of material. Trim all
ends. Take care when restitching to make
a new stitch line.
12-2


