TM 9-2350-261-34
R E P A I R R A D I A T O R
DESCRIPTION
This task covers:
Clean and Inspect (page 5-2).
Test Radiator For Leaks (page 5-2).
Flush
Radiator (page 5–3).
Test Radiator For Flow (page 5-3).
Repair (page 5-3).
Rodding (page 5-4).
INITIAL SETUP
Tools:
Metal Worker’s Tool Kit (Item 61, App B)
Industrial Goggles (Item 37, App B)
Radiator Flow Test Machine (Item 34, App B)
Radiator Test Plug Set (Item 75, App B)
Radiator Test Stand (Item 91, App B)
Scratch Wire Brush (Item 11, App B)
Utility Apron (Item 5, App B)
Materials/Parts:
Solder (Item 80, App C)
Soldering flux (Item 77, App C)
Personnel Required:
Metal Worker 44B10
References:
See your -20
TM 750-254
TB SIG 222
TM 9-237
Equipment Conditions:
Radiator removed from carrier (see your -20)
CLEAN AND INSPECT
TEST RADIATOR FOR LEAKS
1.
2.
Clean radiator. See TM 750-254. Use safety
goggles, rubber gloves and rubber apron.
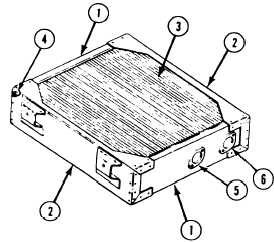
Inspect radiator. Check upper and lower
tanks (1), side brackets (2), tubes and
fins (3). If damage is minor, pressure test
radiator. If damage is major, see repair
instructions to determine if radiator can be
repaired.
3.
4.
5.
6.
7.
W A R N I NG
Radiator can burst if over
pressurized. Do not exceed
25 psi (172 kpa) air pres-
sure.
Ensure radiator is
submerged before applying
air pressure. Always wear
safety goggles.
Plug auxiliary tank connector opening (4).
Use radiator test plug set.
Plug radiator outlet opening (5). Use radiator
test plug set.
Connect regulated air supply from radiator
test stand to inlet opening (6).
Submerge radiator in radiator test stand.
Apply 20–25 psi ( 137–172 kPa) air pressure
to radiator.
If air bubbles appear, repair radiator
(see steps 16-21).
5-2