TM 9-2350-261-34
R E P A I R M A C H I N E G U N S H I E L D M O U N T I N G A R M ( M 1 1 3 A 2 A ND
M 1 0 5 9 O N L Y)
INITIAL SETUP
Tools:
General Mechanics Tool Kit (Item 35, App B)
Hand Arbor Press (Item 72, App B)
Materials/Parts:
Bearing
Bushing
Lockwasher (2)
Personnel Required:
Track Vehicle Repairer 63H10
References:
See your -10
See your -20
Equipment Conditions:
Rear armor shield mounting arm removed
(see your –20)
REMOVE
1.
2.
3.
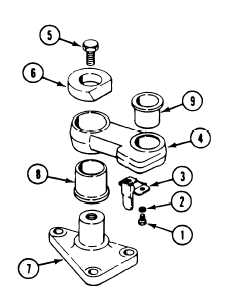
Remove two cap screws (1) and
lockwashers (2) that secure lock (3) to
arm (4). Remove lock. Discard lockwashers.
Remove cap screw (5) that secures mount (6)
and bracket (7) to arm (4). Remove mount
and bracket.
Press bracket bearing (8) and bushing (9)
from arm (4). Discard bearing and bushing.
4.
5.
6.
Press new bushing
bearing (8) in arm
Install bracket (7),
(9) and bracket
(4).
arm (4), and mount
Secure with cap screw (5).
Secure lock (3) to arm (4) with two new
lockwashers (2) and cap screws (1).
(6).
FOLLOW-THROUGH STEPS
1. Install rear armor shield mounting arm
(see your -20).
END OF TASK
20-9 (20-10 blank)
I N S T A L L