TM 9-2350-261-20-2
R E P L A C E C O O L I N G F A N A S S E M B L Y
DESCRIPTION
This task covers: Remove (page 8-44).
Install (page 8-45).
INITIAL, SETUP
Tools:
General Mechanics Tool Kit (Item 30, App D)
Endless Sling (Item 64, App D)
Socket Wrench Set (Item 89, App D)
Torque Wrench (Item 95, App D)
Materials/Parts:
Decal, if needed
Suitable container
Personnel Required:
Unit Mechanic
Personnel Required (cont):
Helper (H)
References
see your -10
see your LO
Equipment Conditions:
Engine stopped/shutdown (see your -10)
Carrier blocked (see your -10)
Power plant grill raised (page 5-2)
R E M O V E
WARNING
Cooling fan is heavy and
can cause back injury if
handled improperly. Be
sure to use a hoist or helper
to remove cooling fan.
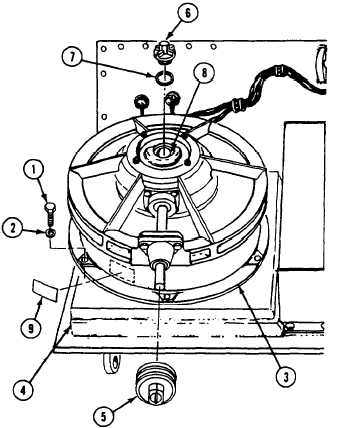
1. Attach sling and suitable lifting device of at
least 150 lbs (45 kg) capacity to fan
assembly.
2. Remove six screws (1) and washers (2) that
secure fan assembly (3) to power plant
grill (4).
3. Lift fan assembly (3) from power plant grill
(4) and place fan assembly on work bench or
a flat wooden board.
4. Remove fan drive pulley (5) from fan assem-
bly (3) (page 8-41).
5. Remove plug (6) and packing (7) from right
angle gearbox (8) use suitable container and
drain gearbox (see your LO).
8-44
Change 4
6. If decal (9) is damaged or unreadable,
remove it.