TM 9-2350-261-20-2
R E P L A C E C O M B A T F I L L E R C O V E R A N D L O CK
INITIAL SETUP
Tools:
References:
General Mechanics Tool Kit (Item 30, App D)
See your -10
Materials/Parts:
Equipment Conditions:
Self-locking nut
Engine stopped/shutdown (see your -10)
Spring pin (3)
Power plant rear access panel removed
(see your -10)
Personnel Required:
Unit Mechanic
REMOVE
1.
2.
3.
4.
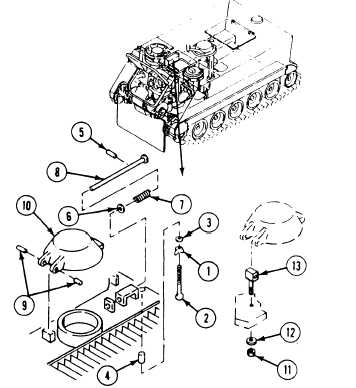
Loosen wingnut (1). Remove thumbscrew (2),
washer (3), and spacer (4) from power plant
grill.
Remove spring pin (5), washer (6), spring (7),
and pin (8) from power plant grill. Discard
spring pin.
Remove two spring pins (9) and cover (10)
from power plant grill. Discard spring pins.
On M577A2 only, remove locknut (11),
washer (12), and rod end (13) from power
plant grill. Discard locknut.
INSTALL
5.
6.
7.
Secure cover (10) to power plant grill with
two new spring pins (9).
Install pin (8) in power plant grill. Secure
with spring (7), washer (6), and new spring
pin (5).
Install wingnut (1), washer (3), and
spacer (4) on thumbscrew (2).
8.
9.
On M577A2 only, secure rod end (13) to
power plant grill with washer (12) and new
locknut (11).
Install thumbscrew (2) in power plant grill.
FOLLOW-THROUGH STEPS
1. Install power plant rear access panel
(see your –10).
END OF TASK
8-33