TM 9-2350-261-20-2
R E P L A C E N E U T R A L S T A R T S W I T CH
INITIAL SETUP
Tools:
References:
General Mechanics Tool Kit (Item 30, App D)
See your -10
Digital Multimeter (Item 43, App D)
Equipment Conditions:
Materials/Parts:
Engine stopped/shutdown (see your –10)
Lockwasher (2)
Carrier blocked (see your -10) -
Transmission range selector removed from
Personnel Required:
carrier (page 23-48)
Unit Mechanic
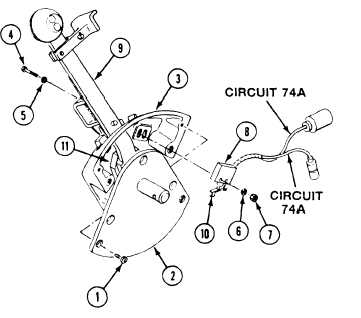
REMOVE
1. Remove two screws (1) and cover (2) from
housing (3).
2. Remove two screws (4), washers (5), lock-
washer (6), nuts (7), and neutral start
switch (8) from housing (3). Discard lock-
washers.
CLEAN, INSPECT, AND REPAIR
3.
4.
5.
6.
Clean switch with a clean, dry cloth.
Check neutral start switch (page 3-15).
Check switch. Replace switch that has worn
or damaged arm or roller.
Check switch leads. Replace damaged leads
(page 14-3) or switch.
INSTALL AND ADJUST
7.
8.
9.
Install neutral start switch (8) on hous-
ing (3). Secure with two screws (4), washers
(5), new lockwashers (6), and nuts (7). Do
not tighten nuts.
Place selector (9) in neutral.
Slide neutral start switch (8) and attaching
screws (4) up or down in elongated holes in
housing (3) to set switch adjustment. Moving
switch (8) down moves lever (10) closer to
actuating cam (11). This increases selec-
tor (9) travel with switch actuated.
GO TO NEXT PAGE
23-53