TM 9-2350-261-20-2
R E P L A C E F I N A L D R I V E P I N I O N O I L S E A L
I N I T I A L S E T U P
Tools:
General Mechanics Tool Kit (Item 30, App D)
Socket Wrench Set (Item 89, App D)
Torque Wrench (Item 95, App D)
Material/Parts:
Antiseize compound (Item 4, App C)
Sealing compound (Item 48, App C)
Gasket
seal
Self-locking bolt (4)
Self-locking bolt (3)
Personnel Required:
Unit Mechanic
References:
See your -10
Equipment Conditions:
Engine stopped/shutdown (see your -10)
Carrier blocked (see your -10)
Trim vane lowered (see your -10)
Power plant front access door opened
(see your -10)
Drive shaft removed (page 20-7)
Final drive yoke removed (page 20-5)
Hull front access cover removed (left final
drive only) (page 24-24)
R E M O V E
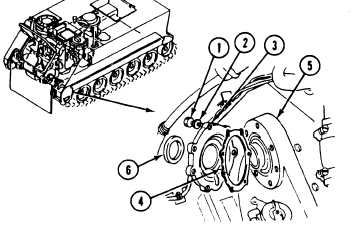
6.
1. Remove seven lockbolts (1), washers (2),
cover (3), and gasket (4) from final drive (5).
Discard gasket and bolts.
2. Remove seal (6) from cover (3). Discard seal.
C L E A N , I N S P E C T A N D R E P L A C E
3. Check fittings and housing for cracks, leaks,
damage or wear. Replace as needed.
I N S T A L L
4. Apply sealing compound to new seal (6). In-
stall in cover (3) flush with surface of cover.
5. Apply a light coat of antiseize compound to
threads of seven new lockbolts (1).
Install new gasket (4) and cover (3) on final
drive (5). Secure with seven new lockbolts (1)
and washers (2). Tighten screws to 252-300
lb-in (28-34 N•m) torque. Use torque wrench.
F O L L O W - T H R O U G H S T E P S
1. Install
2. Install
3. Install
final drive yoke (page 20-5).
5.
drive shaft (page 20-7).
6.
hull front access cover (left final drive
only) (page 24-24).
7.
4. Close power plant front access door
(see your -10).
8.
Raise trim vane (see your -10).
Remove blocks used to keep carrier from mov-
ing (see your -10).
Road test earner (page 2-45) to check final
drive. Check for leaks around seal.
Stop/shutdown engine (see your -10).
END OF TASK
20-11