TM 9-2350-261-20-2
R E P L A C E T R A I L E R H A R N E S S
DESCRIPTION
This task covers:
Remove (page 17-2).
Clean, Inspect, and Repair (page 17-2).
Install (page 17-3).
INITIAL SETUP
Tools:
References:
General Mechanics Tool Kit (Item 30, App D)
See your -10
Digital Multimeter (Item 43, App D)
Equipment Conditions:
Materials/Parts:
Engine stopped/shutdown (see your -10)
Gasket
Carrier blocked (see your -10)
Lockwasher (2)
Ramp raised (see your -10)
Rear floor plates removed (page 24-37)
Personnel Required:
Battery ground leads disconnected (page 13-2)
Unit Mechanic
REMOVE
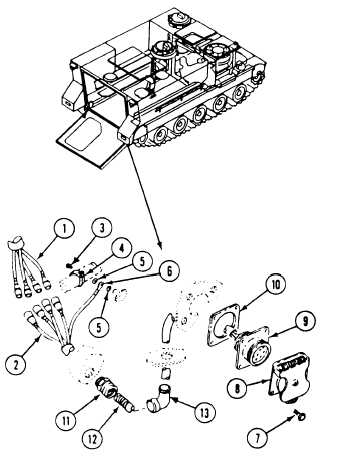
1.
2.
3.
4.
Disconnect rear wiring harness circuit 21, 22,
23, and 24 leads (1) from trailer wiring
harness circuit 21, 22, 23, and 24 leads (2).
Remove shell connectors from leads (2)
(page 14-9).
Remove screw (3), clamp 14), two lockwashers
(5), circuit 90 lead (6) from hull weldnut.
Discard lockwashers.
Remove four screws (7) and receptacle cover
(8) from ramp. Carefully remove receptacle
(9) with attached leads (2) and gasket (10)
from ramp. Discard gasket.
5. If needed, remove connector (11) from rear
bulkhead.
6. If needed, remove spring ( 12) and elbow (13)
from ramp.
CLEAN, INSPECT, AND REPAIR
7. Check receptacle. Repair or replace cracked or
broken receptacle (page 14-7).