TM 9-2350-261-20-2
CLEAN, INSPECT, AND REPAIR
21. Check starter drive teeth. Remove burs. Re-
place starter that has damaged teeth or
teeth worn beyond original shape.
NOTE
Check that starter-to-engine housing
gasket is in place. Gasket is necessary to
keep water out of starter.
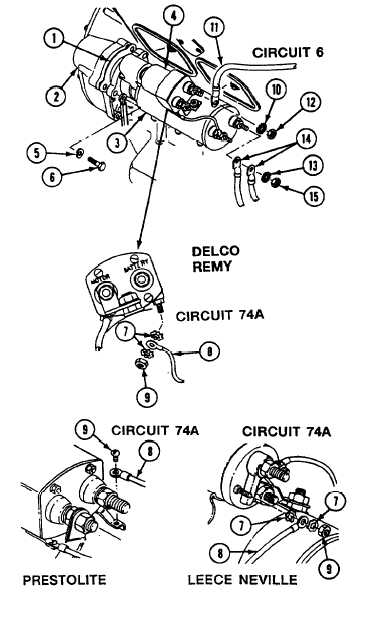
ALTERNATE INSTALL
22. Install new gasket (1) on engine (2).
23. Slide starter (3) with solenoid (4) on steel
rods up to the flywheel. Secure with one
new lockwasher (5) and bolt (6) to hold in
place.
24. Remove two steel rods from threaded holes
and install remaining two new lockwashers
(5) and bolts (6). Tighten all three bolts to
137-147 Ibft torque. Use torque wrench.
25. Install two new lo&washers (7) (Delco and
Leece Neville only) and circuit 74A lead (8)
on terminal of starter solenoid (4). Secure
with nut (9) (screw on Prestolite).
26. Install new lockwasher (10) and circuit 6
lead (11) on terminal of solenoid (4). Secure
with nut (12).
27. Install new lockwasher (13) and two ground
leads (14) on terminal of starter (3). Secure
with nut (15).
28. Install exhaust pipe (see page 7-16).
FOLLOW-THROUGH STEPS
1. Install power plant (page 5-12) (if removed).
3. Start engine. Check that starter is operable
(see your -10).
2. Connect battery ground leads (page 13-2).
4. Stop/shutdown engine (see your -10).
END OF TASK
Change 4
10-3