R E P L A C E E N G I N E O I L F I L T E R A S S E M B L Y
INITIAL SETUP
Tools:
References:
General Mechanics Tool Kit (Item 30, App D)
see your -10
see your Lo
Materials/Parts
Sealing compound (Item 46, App C)
Equipment Conditions:
Engine stopped/shutdown (see your -10)
Personnel Required:
Ramp lowered (see your -10)
Unit Mechanic
Driver’s power plant access panel removed
(page 24-25)
1.
2.
3.
4.
5.
6.
7.
8.
9.
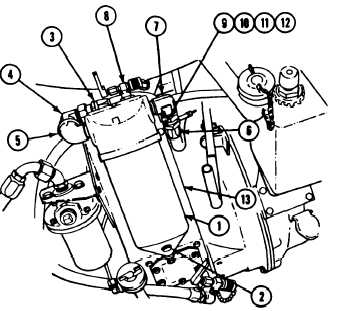
Place a container of suitable size under filter
assembly (1).
Remove drain plug (2) from filter assembly
(1). Allow engine oil to drain.
Disconnect oil hose (3) from elbow (4).
Remove elbow (4) from elbow (5).
Remove elbow (5) from filter assembly (1).
Disconnect oil hose (6) from elbow (7).
Remove elbow (7) from filter assembly (l).
Remove sampling valve (8).
Remove four screws (9), two washers (10),
four nuts (11), two clamps (12), and filter
assembly (1) from bracket (13).
I N S T A L L
10. Apply a thin even coat of sealing compound
to cleaned external threads of elbows (4, 6,
and 7) before installation.
N O TE
Washers (10) are used on the two top
screws only.
11.
12.
Install filter assembly (1) and two clamps
(12) on bracket (13). Secure with four
screws (9), two washers (10), and four
nuts (11).
Install sampling valve (8).
GO TO NEXT PAGE
T M 9 - 2 3 5 0 - 2 6 1 - 2 0 - 1
REMOVE
4-5