TM9-2350-261-20-2
C L E A N , I N S P E C T , A N D R E P L A C E
12. Check hoses, fittings, hardware, and differ-
ential housing for leaks, cracks, and wear.
Replace as needed.
I N S T A L L
13.
14.
15.
16.
17.
18.
19.
20.
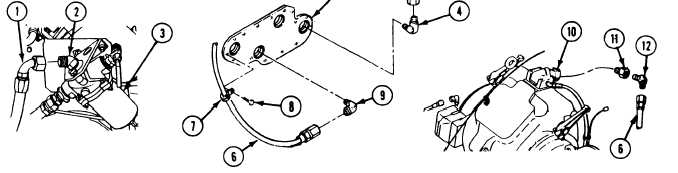
Install oil filter hose (1) in earner.
Connect filter hose (1) to elbow (2)
filter (3’). Use adjustable wrench.
Apply a thin coat of primer N and
compound only to threads of elbow
are being installed into cooler (5).
Install elbow (4) in oil cooler (5).
on
sealing
(4) that
Connect filter hose (1) to elbow (4).
Install hose (6) in carrier.
Install clamp (7) on hose (6). Secure
(7) to oil cooler (5) with screw (8).
clamp
Apply a thin coat of primer N and sealing
compound only to threads of elbow (9) that
are being installed into cooler (5).
21.
22.
23.
24.
25.
26.
27.
28.
29.
30.
Install elbow (9) at oil
Connect oil hose (6) to
oil cooler (5).
cooler (5).
elbow (9) at
If removed, install elbow (10) in differential.
Apply a thin coat of primer N and sealing
compound to external threads of adapter
(11).
Install adapter (11) in elbow (10).
Apply a thin coat of primer N and sealing
compound only to threads of elbow (12) that
are being installed into adapter (11).
Install elbow (12) in adapter (11).
Connect oil hose (6) to elbow (12) at
differential.
Fill differential (see your LO).
Start engine (see your -10). Check for oil
leaks.
F O L L O W - T H R O U G H S T E P S
1. Stop/shutdown engine (see your-10).
3. Install hull bottom access cover (page 24-32).
2. Install driver’s power plant acess panel
4. Close power plant front access door and raise
(page 24-25).
trim vane (see your -10).
END OF TASK
21-15