TM 9-2350-261-20-2
R E P L A C E B A T T E R Y A N D R E T A I N E RS
( A L L E X C E P T M 1 0 6 A 2 A N D M 1 2 5 A 2)
DESCRIPTION
This task covers:
Remove (page 13-16).
Clean, Inspect, and Repair (page 13-17).
Install (page 13-17).
INITIAL SETUP
Tools:
General Mechanics Tool Kit (Item 30, App D)
Materials/parts
Epoxy Coating Kit (Item 15, App C)
Sodium Bicarbonate (Item 55, App C)
Personnel Required:
Unit Mechanic
Helper (H)
References:
See your -10
TM 9-6140-200-14
Equipment Conditions :
Engine stopped/shutdown (see your –10)
Carrier blocked (see your –10)
Ramp lowered (see your -10)
Battery ground lead disconnected (page 13-2)
Battery terminal lugs removed (page 13-10)
REMOVE
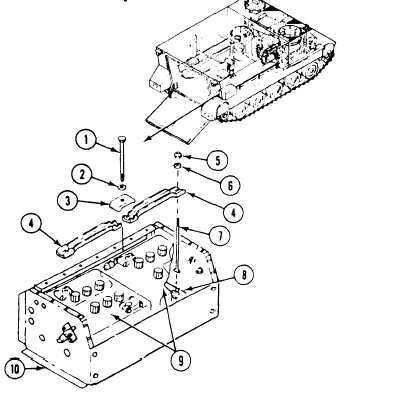
1.
2.
3.
Remove bolt ( 1), washer (2), and clamp (3)
from two retainers (4).
Remove two nuts (5), washers (6), and
retainers (4) from two bolts (7).
Turn bolts (7) to align with slot in frame (8).
Remove bolts from frame.
WARNING
Electrolyte and battery cor-
rosion can cause injury to
you. Wear safety goggles
and gloves. If electrolyte or
battery corrosion contacts
the eyes, skin, or clothing,
flush immediately with large amounts of
cold water. In case of eye or skin contact,
see a doctor immediately.
WARNING
Battery is heavy and can
cause
injury
if handled
improperly. Be sure to have
helper
assist to remove
battery. Battery weighs
about 75 lb (34 kg).
CAUTION
Be careful. Do not hit side of carrier. You
could crack the case. Set battery down
gently onto a board. Have helper assist.
4. Remove batteries (9) from battery box (10).
Lift battery by carrying handles built into
each battery.
13-16