TM 9-2350-261-20-1
R E P L A C E P R I M A R Y F U E L F I L T E R A S S E M B L Y
DESCRIPTION
This task covers:
Remove (page 6-123).
Install (page 6-124).
INITIAL SETUP
Tools:
General Mechanics Tool Kit (Item 30, App D)
Materials/Parts:
Sealing compound (Item 46, App C)
Wiping rag (Item 61, App C)
Suitable container
1 1/4 inch hose
Personnel Required:
Unit Mechanic
References:
See your -10
Equipment Conditions:
Engine stopped/shutdown (see your -10)
Ramp lowered (see your -10)
Battery ground lead disconnected (page 13-2)
Power plant rear access panel removed
(page 24-27 or 24-29)
REMOVE
W A R N I NG
Fuel flowing over a metal
surface
causes
static
electricity. This will cause a
spark unless the surface is
grounded.
N O T E
Use wiping rag to wipe up any spilled fuel.
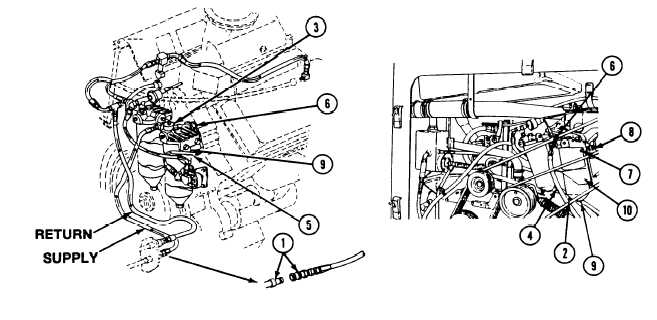
1. Disconnect supply hose at quick disconnect
coupling (1).
2.
3.
4.
5. .
Place a two foot length of 1 1/4 inch hose or
other suitable bulk hose past the drive belts
and idlers. Then slip one end of the hose over
the drain cock. Run the other end of the hose
into a suitable container resting on the crew
compartment floor in order to catch the
drained fuel. Open drain valve (2) and
remove bleed plug (3) to drain filter.
Disconnect two fuel supply hoses (4 and 5)
from two elbows (6).
Remove two nuts (7), screws (8), and filter
assembly (9) from bracket (10).
Remove two elbows (6) from filter
assembly (9).
GO TO NEXT PAGE
Change 1
6-123


