TM 9-2350-261-20-1
R E P L A C E F U E L B L A D D E R F I L L E R F L A N G E ( M 7 4 1 A 1 O N L Y )
INITIAL SETUP
Tools:
References:
General Mechanics Tool Kit (Item 30, App D)
see your -lo
Socket Wrench Set (Item 88, App D)
Torque Wrench (Item 99, App D)
Equipment Conditions:
Materials/Parts:
Engine stopped/shutdown (see your -10)
Battery ground lead disconnected (page 13-2)
Non-electrical wire (Item 31, App C)
Filler cover and lock removed (page 6-7)
Filler cap and strainer parts removed
Personnel Required:
(page 6-89)
Unit Mechanic
Fuel compartment access cover removed
(page 6-91)
Fuel tank bladder drained (page 6-88)
REMOVE
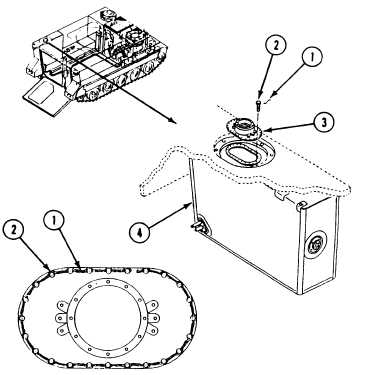
1. Remove lockwire (1), 24 screws (2), and filler
flange (3) from fuel bladder (4). Discard lock-
wire.
INSTALL
2.
3.
4.
5.
Secure filler flange (3) to fuel bladder (4)
with 24 screws (2).
Tighten 24 screws (2) to 10-12 Ib-in
(11-13 CMKG) torque; Use torque wrench
and socket wrench set.
Tighten screws (2) again to 40-60 lb-in
(46-69 CMKG) torque, using cross torque
pattern. Use torque wrench and socket
wrench set.
Install new lockwire (1) through the heads of
24 screws (2).
FOLLOW-THROUGH STEPS
1. Install fuel compartment access cover
3. Install filler cover and lock (page 6-7).
(page 6-91).
4. Fill fuel bladder (see your –10).
2. Install filler cap and strainer parts
(page 6-89).
5. Connect battery ground lead (page 13-2).
.
END OF TASK
6-92