4-13. AIR CLEANER FAN ASSEMBLY REPLACEMENT.
This Task Covers:
a. Removal
b. Installation
Initial Setup:
Tools/Test Equipment:
Equipment Conditions:
• General mechanic’s tool kit
• Vehicle parked on level ground
(Item 24, Appendix I)
(refer to TM 9-2350-287-10).
• Right projectile rack assembly moved to rear
Materials/Parts:
of vehicle (refer to TM 9-2350-287-10).
• Gasket (Item 106, Appendix H)
• Lockwasher (2) (Item 177, Appendix H)
• Self-locking nut (Item 319, Appendix H)
a.
1.
2.
3.
4.
5.
NOTE
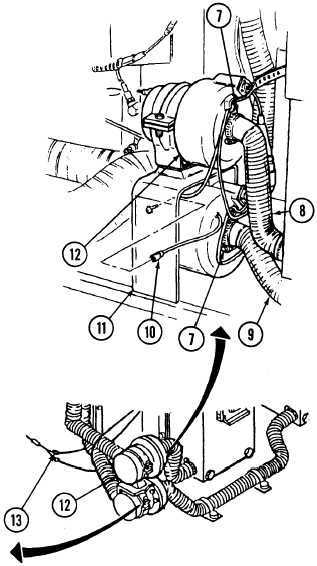
There are two air cleaner fans. Use this procedure
to replace either one. Top air cleaner fan is shown.
Disconnect electrical lead No. 415 (13) from air cleaner
fan (12).
Disconnect ground wire (10) from inside lower air
cleaner fan bracket (11).
Loosen screws in two clamps (7) and remove two
hoses (8 and 9) from air cleaner fan (12).
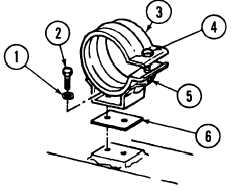
Hold self-locking nut (5) and turn screw (4) to loosen
clamp (3) and remove air cleaner fan (12) from air
cleaner. Remove and discard self-locking nut.
Remove two screws (2) and lockwashers (1),
(6), and clamp (3) from lower air cleaner fan
(11). Discard gasket and Iockwashers.
gasket
bracket
4-31