Materials/Parts:
Equipment Condition:
INITIAL SEPTUP
Test Equipment/Special Tools:
BASE ASSEMBLY: DISASSEMBLY AND ASSEMBLY
Wrench, open-end 1-1/4 inch (item 70, Appx B)
Lubricant, solid wax base (item 72, Appx D)
Base assembly with Shaft removed (p 7-29).
DISASSEMBLY
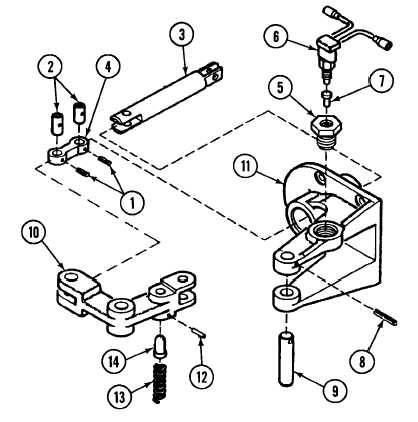
A Remove two spring pins (1). Remove two shafts (2), shaft (3) and link (4)
from base assembly. Discard spring pins.
B
Remove adapter (5) using 1-1/4 inch open-end wrench. Remove switch (6)
and plunger (7) from adapter (5).
C Remove spring pin (8). Remove shaft (9) and lever (10) from base (11).
Discard spring pin.
D Remove spring pin (12). Remove spring (13) and pin (14) from lever (10).
Discard spring pin.
ASSEMBLY
A Install pin (14), spring (13) and new spring pin (12) in lever (10).
B
Install lever (10) in base (11) with shaft (9) and new spring pin (8).
C
D
E
Install plunger (7) and switch (6) in adapter (5). Install adapter (5).
Apply lubricant to shaft (3).
Install shaft (3) and link (4) on base assembly with two shafts (2) and two new
spring pins (1).
7-33
Change 4
TM 9-2350-267-20


