TM 9-2350-261-34
I N S T A L L C A P S T A N K I T ( M 1 1 3 A 2 A N D M 1 0 5 9 O N L Y)
INITIAL SETUP
Tools:
General Mechanics Tool Kit (Item 35, App B)
Hacksaw Frame (Item 39, App B)
Measuring Tape (Item 92, App B)
Torque Wrench (Item 112, App B)
Trailer Mounted Welding Shop
(Item 96, App B
Materials/Parts:
Welding Electrode (Item 83, App C)
Hacksaw blade (Item 10, App C)
Kit P/N 5703657 (19207)
Personnel Required:
Metalbody Repairer 44B
References:
See your -10
See your -20
TM 9-237
TM 43-0139
Equipment Conditions:
Engine stopped (see your –10)
Carrier blocked (see your -10)
Carrier on level surface with tracks removed
from sprockets (see your –20)
INSTALL
1.
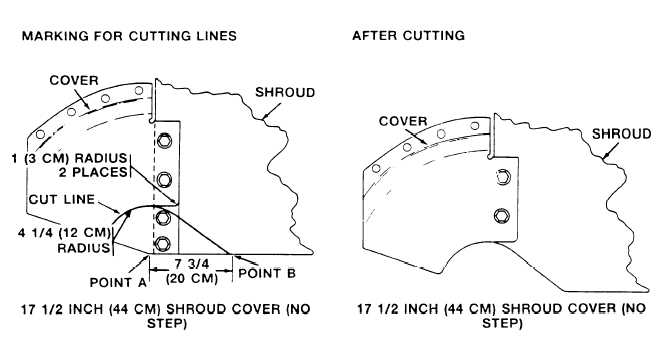
N O TE
There are three configurations of the
shroud cover installation. They are shown
below and on page 17-3. Before cutting,
select the one that your carrier has.
Mark cutting lines as shown in the upper
view of the correct illustration for your
carrier’s shroud cover (left side).
2.
3.
4.
Use hacksaw and cut the front shroud cover
and shroud, as needed, along the cutting
lines. The final cut should look like the lower
view of the correct illustration of your
carrier’s shroud cover (left side).
Repeat above steps (1 and 2) on the right
side of your earner.
Smooth out any sharp edges that may re-
main on the shroud cover with a round file.
17-2