TM 9-2350-261-34
C H A P T E R 16
M A I N T E N A N C E O F N O N - S K I D R A M P K IT
I N S T A L L N O N - S K I D R A M P K I T ( M 1 0 6 A 2 A N D M 1 2 5 A 2 O N L Y)
DESCRIPTION
This task covers:
Prepare Ramp (page 16-1). Install (page 16-3).
INITIAL SETUP
Tools:
Personnel Required:
General Mechanics Tool Kit (Item 35, App B)
Track Vehicle Repairer 63H10
Portable Electric Drill (Item 23, App B)
Electrical Disc Sander (Item 76, App B)
References:
Pneumatic Hammer (Item 40, App B)
See your -10
Screw Threading Set (Item 79, App B)
Equipment Conditions:
Materials/Parts:
Engine stopped (see your -10)
Non-skid ramp winterization kit (10942588)
Carrier blocked (see your -10)
Wood blocks, 6 x 6 x 12 inches (2)
PREPARE RAMP
1.
2.
3.
4.
5.
6.
7.
8.
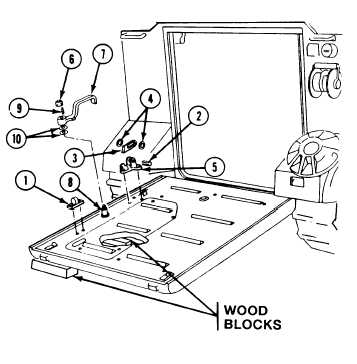
Place two wood blocks at rear of carrier.
Position blocks so ramp and ramp door will
rest on blocks when lowered.
Lower ramp (see your -10) onto blocks.
Remove ramp door handle stop (1). Discard
stop. Use pneumatic hammer.
Grind weld area smooth. Use sander.
Remove spring pin (2) that secures handle
release (3) and two washers (4) to release
bracket (5). Keep release, spring pin, and
washers.
Remove bracket (5). Discard bracket. Use
pneumatic hammer.
Grind weld area smooth. Use sander.
Remove nut (6) that secures inner handle (7)
to outer handle (8). Remove handles, key (9),
and shim washers (10). Discard inner
handle (7). Keep nut, key, and shim washers.
GO TO NEXT PAGE
16-1