TM 9-2350-287-20-1
7-8.
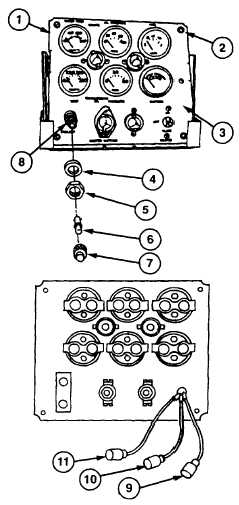
LOW COOLANT INDICATOR LIGHT ASSEMBLY AND WIRING HARNESS (12260297)
REPLACEMENT.
This Task Covers:
a.
Removal
b.
Installation
Initial Setup:
Tools/Test Equipment:
Battery ground cables disconnected
General mechanic's tool kit (Item 24,
(para 7-41).
Appendix I)
Equipment Conditions:
Vehicle parked on level ground
(refer to TM 9-2350-287-10).
a.
REMOVAL
1.
Turn indicator lens (7) counterclockwise, and
remove indicator lens (7) and light bulb (6) from
low coolant indicator (8).
2.
Push in and turn four screws (2) and remove
panel (3) from driver's portable instrument panel
(1).
3.
Remove nut (5), low coolant indicator (8), and
washer (4) from panel (3).
4.
Disconnect leads 27 (9), 352A (10), and 352B
(11) from wiring harness 12260298 leads 27,
352A, and 352B.
(Text Deleted]
b.
INSTALLATION
1.
Connect lead 27 (9) on panel (3) with laser
harness 12260298 lead 27; connect lead 352A
(10) to wiring harness 12260298 lead 352A; and
connect lead 352B (11) to wiring harness
12260298 lead 352B.
2.
Install low coolant indicator (8) on panel (3) with
washer (4) and nut (5).
3.
Install panel (3) on driver's portable instrument
panel (1) and turn four screws (2) to tighten.
4.
Install light bulb (6) and lens (7) on low coolant
indicator (8).
FOLLOW-ON MAINTENANCE:
Connect battery ground cables (para 7-41).
Change 1 7-23