TM 9-2350-261-20-2
REPAIR BLACKOUT MARKER LIGHT
INITIAL SETUP
Tools:
References:
General Mechanics Tool Kit (Item 30, App D)
See your-10
Multimeter (Item 43, App D)
Equipment Conditions:
Materials/Parts:
Engine stopped/shutdown
Gasket
Carrier blocked (see your
Light bulb, as needed
Personnel Required:
Unit Mechanic
(see your -10)
-10)
1.
2.
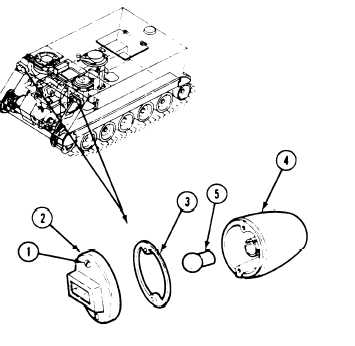
Loosen two screws (1). Remove door (2) and
gasket (3) from light body (4). Discard
gasket.
Push in on bulb (5) and turn to the left.
Remove bulb from body (4).
CLEAN, INSPECT, AND REPAIR
3. Check lens in door. Replace blackout marker
door assembly if lens is cracked or chipped.
4. Check bulb. Use multimeter. Replace bad bulb.
5. Check body. Replace blackout marker light if
any part is missing or damaged (page 12–7).
INSTALL
6. Place bulb (5) in light body (4). Push in on
bulb and turn to the right to secure.
7. Install new gasket (3), door (2), and two
screws (1) on body (4).
FOLLOW-THROUGH STEPS
1. Turn MASTER SWITCH ON (see your –10).
3. Turn all switches OFF on instrument panel
(see your -10).
2. Turn blackout marker light switch ON to
check that light operates properly
4. Turn MASTER SWITCH OFF (see your -10).
(see your –10).
END OF TASK
12-8
R E M O V E