TM 9-2350-261-20-1
R E P L A C E M U F F L E R A N D B R A C K E TS
DESCRIPTION
This task covers: Remove (page 7-20).
Install (page 7-21).
INITIAL SETUP
Tools
General Mechanics Tool Kit (Item 30, App D)
Materials/Parts
Lockwasher (2)
Cotter pin
Self-locking nut (2)
Personnel Required
Unit Mechanic
References
see your -10
Equipment Conditions
Engine stopped/shutdown (see your -10)
Carrier blocked (see your -10)
Trim vane lowered and power plant front
access door open (see your -10)
Power plant rear access panel removed
(page 24-27 or 24-29)
REMOVE
3.
W A R N I N G
If you work on a carrier
that has been running, you
4.
could be burned. All tasks
begin with a cooled down
carrier. Allow carrier to
5.
cool, or use care if you work
on a hot carrier.
1.
2.
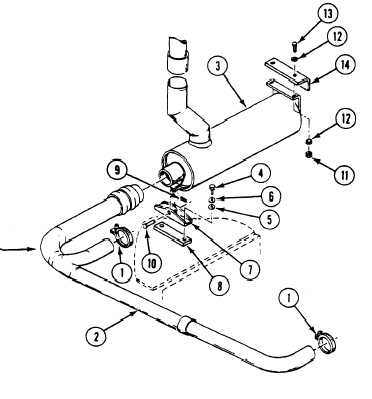
Lift exhaust extension up until it clears the
muffler (page 7-18).
Loosen two clamps (1) and remove pipe (2)
from muffler (3) and manifold.
Remove two screws (4), two washers (5), two
lockwashers (6), and front bracket (7) from
plate (8). Discard lockwashers.
Remove cotter pin (9), pin (10), and muffler
(3) from front bracket (7). Discard cotter pin.
Remove two locknuts (11), four washers (12),
two screws (13), and muffler (3) from rear
bracket (14). Discard locknuts.
7-20