|
| |
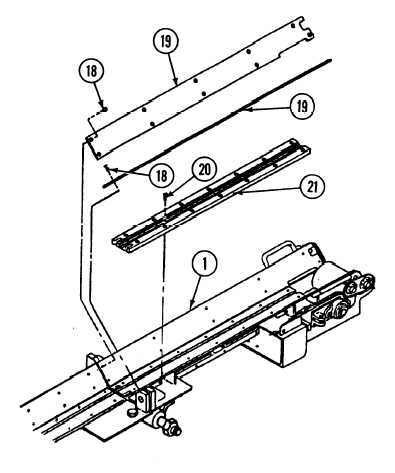
17-12. TAKEUP-END SECTION ASSEMBLY REPAIR (continued).
2.
3.
4.
5.
6.
b.
1.
2.
3.
4.
5.
6.
7.
Remove takeup-end section assembly (1) from conveyor center section (7).
Remove eight screws (8) and nuts (17), 16 washers (9), four straps (10), wire assembly (11), and two retaining
strips (12) and chain guards (13) from takeup-end section assembly (1).
Remove two screws (16), chain-return wear strip (15), and spacer (14) from takeup-end section assembly (1).
Remove 20 screws (18) and two side wear strips (19) from takeup-end section assembly (1).
Remove 14 screws (20) and bottom wear strip (21) from takeup-end section assembly (1).
INSTALLATION
Apply sealing compound to threads of 20
screws (18).
Install bottom wear strip (21) on takeup-
end section assembly (1) with 14 screws
(20).
Install two side wear strips (19) on takeup-
end section assembly (1) with 20 screws
(18).
Install spacer (14), chain-return wear strip
(15), and two screws (16) on takeup-end
section assembly (1).
Install two chain guards (13) and retaining
strips (12) on takeup-end section
assembly (1) with eight screws (8), 16
washers (9), four straps (10), wire
assembly (11), and eights nuts (17).
Install takup-end section assembly (1) on
conveyor center section (7).
Install six screws (2), washers (4), new
Iockwashers (5), and nuts (6) to secure
two hinge halves (3) to takeup-end section
assembly (1).
FOLLOW-ON MAINTENANCE:
l Install idler sprocket assembly (para 17-15).
l Install conveyor toggle clamp and tube assembly (para 17-18).
l Install rod ends and latch (para 17-16).
l Install conveyor rear dead-end section assembly (para 17-8).
l Install conveyor assembly (para 17-6).
17-29
TM 9-2350-287-20-2
|