|
| |
TM 9-2350-287-20-2
15-62. DRIVER’S SEAT REPAIR (continued).
13.
14.
15.
c.
1.
2.
3.
4.
d.
1.
2.
3.
4.
5.
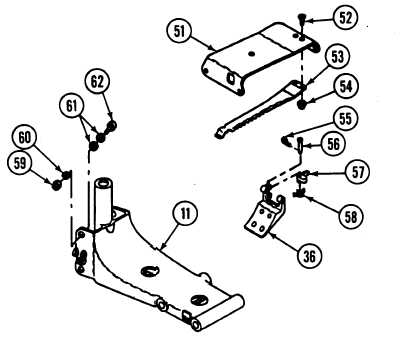
Remove four self-locking nuts (59), washers (60), and cam followers (62) and shims (61) from seat support
(11). Discard self-locking nuts and shims.
Remove cotter pin (55), straight headed pin (56), pawl (57), and spring (58) from seat back bracket (36).
Discard cotter pin.
Remove two self-locking nuts (54) and screws (52)
and adjusting lever (53) from lower support bracket
(51). Discard self-locking nuts.
CLEANING AND INSPECTION
WARNING
Drycleaning solvent P-D-680 is toxic
and flammable. Always wear protective
goggles and gloves, and use only in a
well-ventilated area. Avoid contact with
skin, eyes, and clothes, and DO NOT
breathe vapors. DO NOT use near open
flame or excessive heat
Clean all metal parts with drycleaning solvent and rags.
Inspect all metal parts for cracks, bends, or breaks. Replace any damaged parts.
Inspect driver’s seat pad and backrest cushion for rips or tears. Replace if damaged.
Inspect safety belt for frayed or torn webbing or damaged clasp. Replace any damaged parts.
ASSEMBLY
Position adjusting lever (53) in place under lower support bracket (51) and secure with two screws (52) and
new self-locking nuts (54).
Install pawl (57) and spring (58) on seat back bracket (36) with straight headed pin (56) and new cotter pin
(55).
Install four cam followers (62), new shims (61), and four washers (60) and new self-locking nuts (59) in seat
support (11).
Position driver’s seat (35) in place on lower support bracket (51) and secure with washer (43) and new self-
locking nut (44).
Position seat back bracket (36) and rear bracket (42) in place on driver’s seat (35) and secure with two washers
(36), new self-locking nuts (39), and new self-locking nuts (37).
15-152
|