|
| |
TM 9-2350-287-20-2
10-2. SERVICE AND PARKING BRAKE LINKAGE REPLACEMENT/ADJUSTMENT
(continued).
6.
Install collar (10) on end of brake control rod (9) and secure with new spring pin (15).
WARNING
Use care when installing spring. Spring is under tension and can act as a projectile
when released and could cause severe eye injury.
7.
Install two washers (11), new spring (12), and angle bracket (7) on brake control rod (9).
8.
Install brake handle (13) on end of brake control rod (9) and secure with new spring pin (14).
e.
INSTALLATION
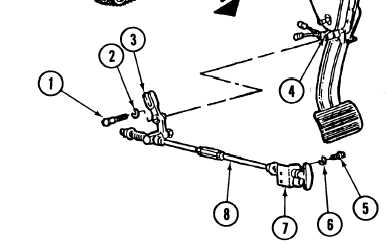
1.
Position brake linkage (8) and bellcrank (3)
2.
in place on bracket spindle (4).
Install two screws (5) and new Iockwashers
(6) on angle bracket (7).
3.
Install screw (1) and new Iockwasher (2) to
secure bellcrank (3) on bracket spindle (4).
4.
Adjust service and parking brake linkage
(para 10-2).
10-4
|