TM 9-2350-287-20-1
8-8. TRANSMISSION FILLER NECK REPLACEMENT.
This Task Covers:
a. Removal
b. Installation
Initial Setup:
Tool/Test Equipment:
• General mechanic’s tool kit (item 24,
Appendix 1)
Materials/Parts:
• Sealing compound (Item 58, Appendix D)
• Gasket (Item 104, Appendix H)
• Lockwasher (4) (Item 183, Appendix H)
• Seal (Item 295, Appendix H)
Equipment Conditions:
• Vehicle parked on level ground (refer to
TM 9-2350-287-10).
• Right transmission access door opened
(refer to TM 9-2350-287-10).
a.
REMOVAL
1.
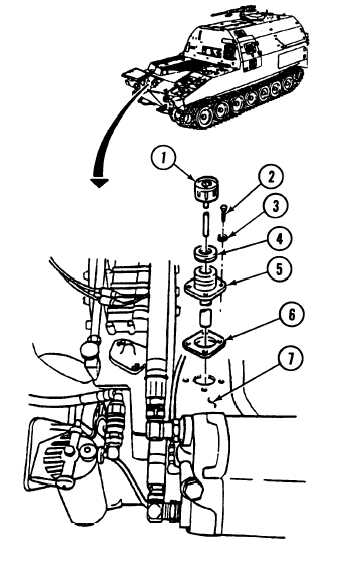
Remove gage rod (1) from filler neck (5).
2.
Remove seal (4) from filler neck (5). Discard seal.
3.
Remove four screws (2), Iockwashers (3), filler
neck (5), and gasket (6) from transmission (7).
Discard gasket and Iockwashers.
b.
INSTALLATION
WARNING
1,
2.
Sealing compounds can bum easily,
give off harmful vapors, and are harmful
to skin and clothing. To avoid injury or
death, keep away from open fire and
use in a well-ventilated area. if sealing
compound gets on skin or clothing,
wash immediately with soap and water.
Apply sealing compound to threads of four screws
(4).
Install new gasket (6) and filler neck (5) on
transmission (7) with four new lockashers (3) and
screws (2).
3.
Install seal (4) on filler neck (5).
4.
Install gage rod (1) in filler neck (5).
FOLLOW-ON MAINTENANCE:
• Close right transmission access door (refer to TM 9-
2350-287-10).
8-28