3-18
Change 1
TM 9-2350-267-34
MOUNT BASE ASSEMBLY REPAIR (CONTINUED)
D
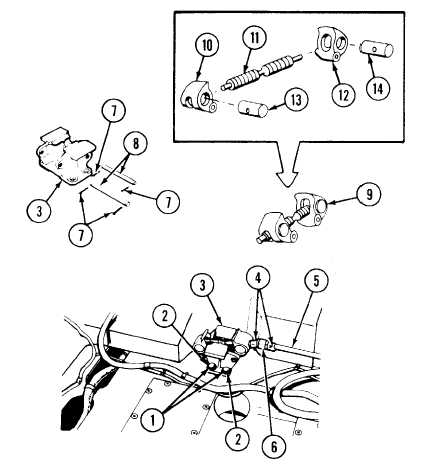
Turn jaw (12) clockwise to remove from bolt (11).
E
Slide jaw nuts (13 and 14) out of jaws (10 and 12)
ASSEMBLY
A
Slide jaw nuts (13 and 14) into jaws (10 and 12).
NOTE
Make sure jaws are evenly spaced on bolt during
installation.
B
Install jaw (12) on bolt (11) by turning counterclockwise.
C
Install jaw (10) on bolt (11) by turning clockwise.
NOTE
Make sure hexhead on bolt is installed on high side
of mount base.
D
Install jaw assembly (9) on mount base (3).
E
Install two jaw pins (8) and four new cotter pins (7).
INSTALLATION
A
Install universal joint (6) on mount base (3) and secure with
new cotter pin (4).
NOTE
B
Install handle (5) on universal joint (6) and secure with new cot-
Inspect mount base, jaws, bolt and jaw nuts for
ter pin (4).
cracks and damaged threads.
C
Install mount base assembly (3) with four screws (1) and four
C
Turn jaw (10) counterclockwise to remove from bolt (11).
new lockwashers (2).
TA312497