SPLINED NUT: REMOVAL AND INSTALLATION (CONTINUED)
INSTALLATION
A
B
C
D
E
F
G
H
I
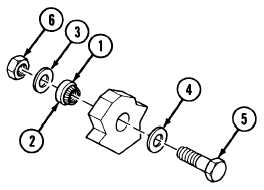
Position new nut (1 or 2) against engine side of hole. Position
large steel flat washer (3) against nut (1 or 2).
Have assistant position large steel flat washer (4) and screw
(5) from driver’s side of bulkhead.
NOTE
Screw (5) and nut (6) for nut (1) must be 3/8-20.
For nut (2), screw and nut must be 3/16-28.
Install nut (6) on screw (5). Have assistant hold screw (5).
Tighten nut (6) to drive nut into fully nested position.
Remove nut (6), screw (5) and washers (3 and 4).
Make sure nut (1 or 2) is fully seated.
Inspect nut (1 or 2) by screwing in appropriate screw and
removing it. Operation should be smooth.
Install driver’s side bulkhead shield and insulation (p 14-13).
Install driver’s seat (for nut 1) (TM 9-2350-267-20). Install
driver’s heating duct (for nut 2) (TM 9-2350-267-20).
Install powerpack (TM 9-2350-267-20).
TA312493
2-19/(2-20 blank)
Change 1
TM 9-2350-267-34

