TM 9-2350-261-20-2
5.
6.
7.
8.
9.
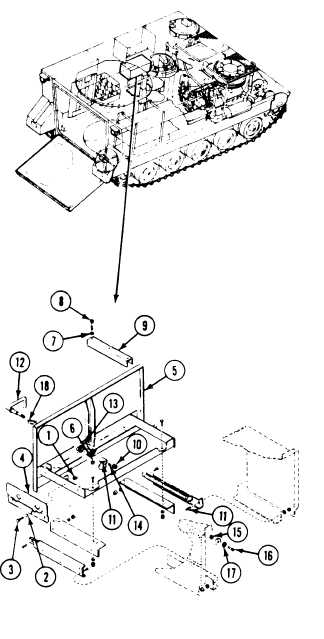
Remove three locknuts (1), washers (2),
screws (3), and plate (4) from side of bat-
tery drawer (5). Discard locknuts.
Remove two locknuts (6), washers (7),
screws (8), and channel divider (9) from bat-
tery drawer (5). Discard locknuts.
Remove locknut (10), cam (11), handle (12),
and washer (13) from battery drawer (5).
Remove key (14) from handle. Discard lock-
nut.
If needed, remove locknut (15), screw (16),
and wear plate (17) from hull mount.
If needed, remove two rubber bumpers (18)
from front of battery drawer (5). -
CLEAN, INSPECT, AND REPAIR
10.
11.
12.
Inspect slide assemblies. If the slide binds or
has damaged stops, install a new slide.
Clean drawer and parts by soaking in a so-
lution of sodium bicarbonate. After foaming
stops, flush with clean water and dry with
clean cloth.
Inspect battery drawer for dents and cracks.
If damaged beyond repair, install new
drawer.
INSTALL
13.
14.
15,
16.
Apply epoxy coating to inside surface of bat-
tery drawer (5).
If removed, install rubber bumpers ( 18) in
battery drawer (5).
If removed, place wear plate (17) on hull
mount. Secure with screw (16) and new
locknut (15).
Install washer (13) and handle (12) in bat-
tery drawer (5). Insert key (14) in handle
and install cam (11). Secure with new lock-
nut (10).
17.
18.
Place charnel divider (9) in battery drawer
(5). Secure with two screws (8), washers
(7), and new locknuts (6).
Place plate (4) on side of drawer (5). Secure
with three screws (3), washers (2), and new
locknuts (1) .
GO TO NEXT PAGE
13-25