|
| |
TM 9-2350-287-20-2
11-12. TRACK PAD REPLACEMENT.
This Task Covers:
a. Removal
b. Installation
Initial Setup:
Tools/Test Equipment:
Equipment Conditions:
General mechanic's tool kit
Vehicle parked on level ground (refer to
(Item 24, Appendix I)
TM 9-2350-287-10).
Torque wrench, 0-175 ft-lb
(Item 69, Appendix I)
Materials/Parts:
Rag (Item 56, Appendix D)
Track shoe kit (Item 377, Appendix H)
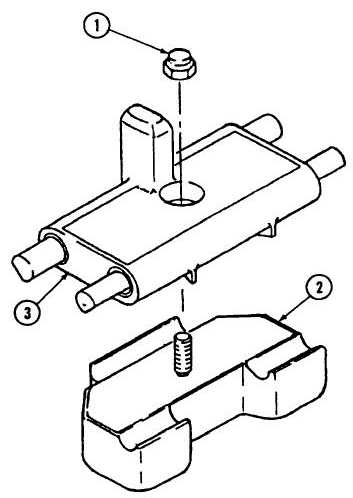
a.
REMOVAL
Remove self-locking nut (1) and track pad (2)
from track shoe (3). Discard self-locking nut and
track pad.
NOTE
When installing track shoe pads, avoid
creating a “hill and valley" profile. Isolated
high points will wear quickly. Adjacent pads
should be the same height. Do not install
pads in an irregular profile; shuffle pads to
maintain a smooth profile.
b.
INSTALLATION
1.
Remove dirt and debris from track shoe (3).
2.
Install new track pad (2) on track shoe (3) with
new self-locking nut (1). Torque between 110
and 150 ft-lb (149 and 203 N
m).
FOLLOW-ON MAINTENANCE:
None
Change 1 11-27
|