|
| |
TM 9-2350-287-20-2
11-4. ROADWHEEL REPLACEMENT (continued).
b.
INSTALLATION
NOTE
· To install roadwheels at positions 2 through 6, perform steps 1 through 5.
· To install roadwheels at positions 1 and 7, perform steps 5 and 6.
· Lubricate all threads with grease.
1.
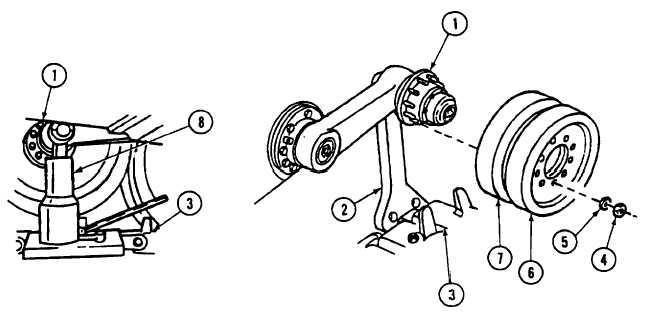
Install inner and outer roadwheels (7 and 6) on roadwheel hub (1) with 10 washers (5) and new self-locking nuts
(4).
WARNING
When driving vehicle on or off lifters, clear the area. Lifters may fly from under the
vehicle and cause serious injury to personnel.
2.
With the aid of an assistant, torque 10 self-locking nuts (4) to 215 ft-lb (292 N
m).
3.
Slowly drive off lifter (2).
4.
Torque 10 self-locking nuts (4) to 215 ft-lb (292 N
m).
5.
Install inner and outer roadwheels (7 and 6) on roadwheel hub (1) with 10 washers (5) and new self-locking nuts
(4). Torque nuts to 215 ft-lb (292 N
m).
6.
Lower hydraulic jack (8) and remove from track (3).
FOLLOW-ON MAINTENANCE:
Connect track (para 11-13).
Change 1 11-10
|

