|
| |
TM 9-2350-287-20-2
15-53. DRIVER’S HATCH COVER REPLACEMENT.
This Task Covers:
a. Removal
b. Disassembly
c. Cleaning and Inspection
d. Assembly
e. Installation
Initial Setup:
TooIs/Test Equipment:
• Lockwire (as required) (Item 201, Appendix H)
• General mechanic’s tool kit (Item 24,
Appendix I)
Personnel Required: Two
• Plier wrench (Item 42, Appendix I)
Equipment Conditions:
Materials/Parts:
• Vehicle parked on level ground (refer to
• Lockwasher (2) (Item 154, Appendix H)
TM 9-2350-287-10).
• Lockwasher (2) (Item 164, Appendix H)
a.
REMOVAL
1.
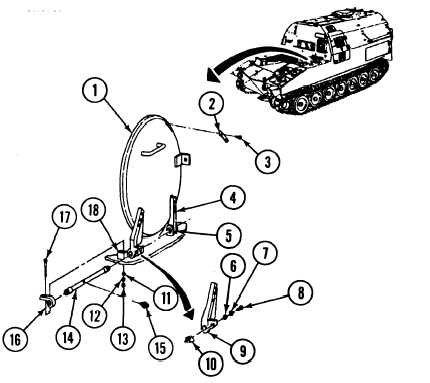
Remove two screws (3) and wear plate (2) from driver's hatch cover (1).
2.
Remove two screws (7), Iockwashers (8), and washers (6) and striker (10) from outer hatch cover arm (9).
Discard Iockwashers.
3.
Raise hatch cover (1) to a vertical neutral position (approximately 90 degrees), and have assistant hold in
place.
4.
5.
6.
7.
Remove two screws (17), washers(11 ), Iockwashers (12), and nuts (13) from torsion bar anchor (16) and
vehicle-mounted block (18). Discard lockwashers.
. .
Remove torsion bar anchor (16) from
torsion bar hinge (14).
Remove grease fitting (15) from torsion
bar hinge (14).
Drive torsion bar hinge (14) out of outer
and inner hatch cover arms (9 and 4) and
vehicle-mounted bracket (5).
8.
15-130
Driver’s hatch cover is heavy.
Two persons are required when
removing driver’s hatch cover.
With the aid of an assistant, remove
hatch cover (1) and attached outer and
inner hatch cover arms (9 and 4) from
vehicle.
|

