TM 9-2350-261-20-1
R E P l A C E F U E L T A N K ( M 1 1 3 A 2 , M 9 0 1 A 1 , A N D M 1 0 5 9 O N L Y)
DESCRIPTION
This task covers:
Remove (page 6-11).
Disassemble (page 6-14).
Clean, Inspect, and Repair
(page 6-15).
Assemble (page 6-15). Install (page 6-17).
INITIAL SETUP
Tools:
Personnel Required: (cont):
General Mechanics Tool Kit (Item 30, App D)
Helper (H)
Socket Wrench Set (Item 89, App D)
Torque Wrench (Item 95, App D)
References:
Torque Wrench (Item 97, App D)
See your -10
Materials/Parts:
Equipment Conditions:
Sealing compound (Item 46, App C)
Tab washer (10)
Engine stopped/shutdown (see your -10)
Cotter pin
Carrier blocked (see your -10)
Lockwasher (6)
Ramp lowered (see your -10)
Self-locking nut (6)
Battery ground lead disconnected (page 13-2)
Fuel tank drained (page 6-5)
Personnel Required:
Fuel filler neck and boot removed (page 6-8)
Fuel quantity transmitter removed (page 6-9)
Unit Mechanic
1.
2.
3.
4.
5.
N O T E
Permanent fuel tank repair is authorized
at depot only. For temporary repair
(page 6-21).
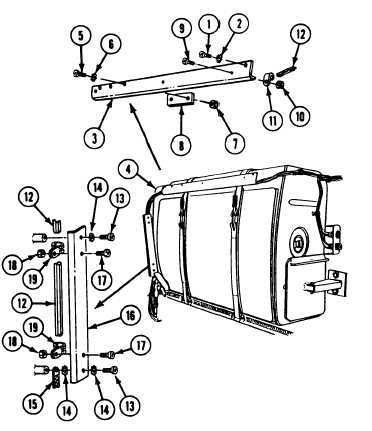
Remove two screws (1), lockwashers (2), and
wiring harness cover (3) from fuel tank (4).
Discard lockwashers.
Remove two screws (5), Iockwashers (6),
locknuts (7), and access cover (8) from
cover (3). Discard lockwashers and locknuts.
Remove three screws (9), locknuts (10),
clamps (11), and wiring harness (12) from
cover (3). Discard locknuts.
Remove two screws (13), three lockwashers
(14), ground lead (15), and wiring harness
guard (16) from hull. Discard lockwashers.
Remove two screws (17), locknuts (18),
clamps (19), and wiring harness (12) from
guard (16). Discard locknuts.
GO TO NEXT PAGE
6-11
REMOVE