|
| |
TM 9-2350-287-34
7-2. FINAL DRIVE ASSEMBLY REPAIR (continued).
a.
DISASSEMBLY
1.
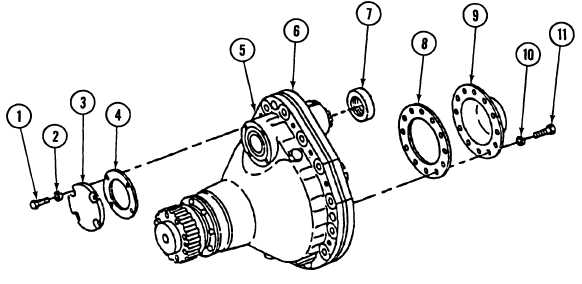
Remove four screws (1) and Iockwashers (2), access cover (3), and gasket (4) from final drive assembly
housing (5). Discard gasket and Iockwashers.
2.
Remove seal (7) from housing cover (6). Discard seal.
3.
Remove 12 screws (11) and Iockwashers (10), access cover (9), and gasket (8) from housing cover (6).
Discard Iockwashers and gasket.
4.
Remove seven screws (16) and Iockwashers (17), housing cover (6), and gasket (14) from housing (5).
Discard Iockwashers and gasket.
5.
Remove two plugs (15) from housing cover (6).
6.
Remove input splined gearshaft (13) from housing (5).
7.
Using arbor press, remove two bearings (12) from input splined gearshaft (13).
8.
Remove cotter pin (22) and nut (23) from output shaft (18). Discard cotter pin.
9.
Remove ring gear (20), spacer (19), and output shaft (18) from housing (5).
10.
Remove bearing (21) from ring gear (20).
7-2
|