|
| |
TM 9-2350-287-20-2
11-14. TRACK REPLACEMENT (continued).
12.
Tighten two track connecting fixtures (9) until four track link pins (6) are close enough for two end connectors (3)
to be installed.
13.
Install two end connectors (3) on four track link pins (6). Tap lightly with hammer until end connectors (3) are one
inch away from track shoe.
14.
Remove two track connecting fixtures (9) from four track link pins (6).
15.
Tap two end connectors (3) lightly with hammer to seat connectors (3) flush with track link pins (6).
16.
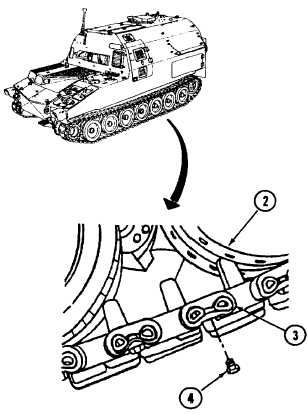
Drive forward until two end connectors (3) are at 12 o'clock position over idler wheel (2).
17.
Install two new bolts (4) in two end connectors (3).
18.
Torque bolts between 380 and 420 ft-lb (515 and 570 N
m).
19.
Mark the end connectors (3).
20.
Drive vehicle for a short distance at a speed not to exceed 10 miles per hour, alternating right and left steers.
21.
Stop vehicle and visually inspect the four end connectors (3) of replaced track shoe. Reposition any end
connectors that have shifted.
22.
Torque four bolts (4).
FOLLOW-ON MAINTENANCE:
Adjust track tension (refer to TM 9-2350-287-10).
Change 1 11-37/(11-38 blank)
|