|
| |
18-12. APU EXHAUST MUFFLER, PIPES, AND SHIELD REPLACEMENT (continued).
b.
1.
2.
3.
4.
5.
6.
7.
8.
9.
10.
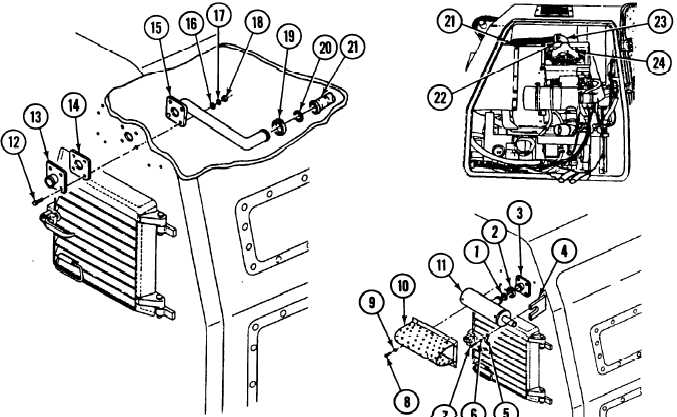
INSTALLATION
Install elbow (23) on exhaust manifold (24).
Install flexible hose (21) on elbow (23) and secure with clamp (22).
Install flange (13) and new gasket (14) on outside of vehicle hull with four screws (12).
Position exhaust pipe over (15) four screws (12) in APU compartment.
Secure exhaust pipe (15) on four screws (12) with four washers (16), new Iockwashers (17), and nuts (18).
Position clamp (19) on flange of exhaust pipe (15).
Install new shim (20) between exhaust pipe (15) and flexible pipe (21). Install flexible pipe (21) on exhaust
pipe (15) with clamp (19).
Install new gasket (l), clamp (2), and APU muffler (11) on flange (3).
Install retaining strap (5) on the APU muffler bracket (4) with two new Iockwashers (6) and screws (7).
Install muffler shield (10) on vehicle hull over APU muffler (11) with seven new Iockwashers (9) and screws
(8).
FOLLOW-ON MAINTENANCE:
• CIOse APU compartment side door (refer to TM 9-2350-287-10).
• Run APU and inspect for exhaust leaks (refer to TM 9-2350-287-10).
18-34
TM 9-2350-287-20-2
|