|
| |
TM 9-2350-287-20-2
15-91. RIGHT CANISTER RESTRAINTS REPAIR (continued).
2.
Push release plate of each of three buckles (21) to loosen three restraint straps (22), and unhook six snap-hooks
(19) from six eyebolts (23).
3.
Remove three restraint bar assemblies (20), with three attached restraint straps (22), from six bar slide tracks
(11).
4.
Remove six nuts (16), lockwashers (17), washers (18), and eyebolts (23) from six bar slide tracks (11). Discard
lockwashers.
5.
Release two ratchet buckle assemblies (14) and ratchet buckle assembly (9) to release tension on two strap
assemblies (12) and strap assembly (6).
6.
Unhook ratchet buckle assembly (9), two ratchet buckle assemblies (14), snaphook (7), and two snaphooks (13)
from six strap studs (8).
7.
Remove strap assembly (6) and two strap assemblies (12) from two shelves (10 and 15).
8.
Remove six strap studs (8) from two shelves (10 and 15).
9.
Unbuckle and remove four strap assemblies (24) from fasteners (25) on right front canister compartment (1).
b.
DISASSEMBLY
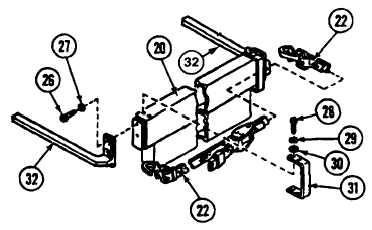
1.
Remove fourscrews (26) and lockwashers (27) and two slides (32) from each of three restraint bar assemblies
(20). Discard lockwashers.
2.
Remove eight screws (28), lockwashers (29), and washers (30), two fasteners (31), and restraint strap (22) from
each of three restraint bar assemblies (20). Discard lockwashers.
c.
INSPECTION
Inspect all parts for cracks, bends, breaks, rips, or tears. Replace any damaged parts.
d.
ASSEMBLY
WARNING
Sealing compounds can bum easily, can give off harmful vapors, and are harmful to skin and
clothing. To avoid injury or death, keep sealing compound away from open fire and use in a well-
ventilated area. If sealing compound gets on clothing, wash immediately with soap and water.
1.
Apply sealing compound to threads
of eight screws (28) and install with
eight new lockwashers (29) and
washers (30), restraint strap (22),
and two fasteners (31) on each of
three restraint bar assemblies (20).
2.
Install four screws (26) and new
lockwashers (27) and two slides
(32) on each of three restraint bar
assemblies (20).
Change 1 15-241
|