|
| |
TM 9-2350-287-20-2
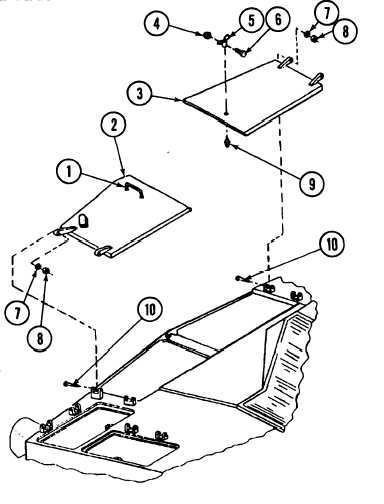
15-12. TRANSMISSION ACCESS DOORS REPLACEMENT (continued).
2.
Remove two self-locking nuts (8), washers
(7), and screws (10) from access door (2 or 3)
and hull. Discard self-locking nuts.
3.
4.
b.
WARNING
Personnel must stand clear
during Iifting operatoons. A
swinging or shifting load
can cause injury to
personnel.
Lift access door (2 or 3) from vehicle and place
on suitable work surface. Remove chain and
hoist.
NOTE
Step 4 is for the right access
door only.
Remove screw (6), self-locking nut (4), handle
(5), and stud (9) from access door (3). Discard
self-locking nut.
INSTALLATION
NOTE
Step 1 is for the right access
door only.
1.
Install stud (9) and handle (5) on access door (3) with new self-locking nut (4) and screw (6).
2.
Install endless sling on handle (1) on access cover (2 or 3) and hoist, and take up slack.
Personnel must stand clear during lifting operations. A swinging or shifting load can
cause injury.
NOTE
An assistant is needed to properly position access door on vehicle.
3.
Lift access door (2 or 3) into position on vehicle.
4.
Secure access door (2 or 3) to vehicle with two screws (1 O), washers (7), and new self-locking nuts (8).
15-26
|