4-10
Change 2
TM 9-2350-267-34
FUEL TANKS: REMOVAL AND INSTALLATION
INITIAL SETUP
Test Equipment/Special Tools:
Wrench, open-end, 1-1/4 inch (item 29, Appx D)
Wrench, open-end, 1-1/2 inch (item 30, Appx D)
Fuel hose (item 10, Appx D)
Wrench, torque (item 31, Appx D)
Suitable lifting device
Materials/Parts:
Sealing compound (item 46, Appx B)
Gasket material (item 74, Appx B)
Tape, antiseize (item 71, Appx B)
Personnel:
Three
References:
TM 9-2350-267-20
Equipment Condition:
Engine exhaust and outlet tube and pipe removed (TM
9-2350-267-20).
Air cleaner duct and elbow removed (TM 9-2350-267-20).
Heat shield removed (TM 9-2350-267-20).
Battery ground cables disconnected.
General Safety Instructions:
No smoking or open flames when removing fuel tanks.
REMOVAL
NOTE
Fuel tank capacity is 135 gallons. Fuel tank(s) may
be drained by removing drain plug at bottom of
vehicle or by using fuel tank electric fuel pumps
to pump fuel from tanks. Ensure master relay is
connected with power cable. Pumping requires
one-and-a-half to two hours to drain a full system.
Using drain plug at bottom of vehicle allows drain-
ing the system in less than 30 minutes. If drain-
ing fuel, refer to TM 9-2350-267-20. If pumping
tanks dry, perform steps A thru E.
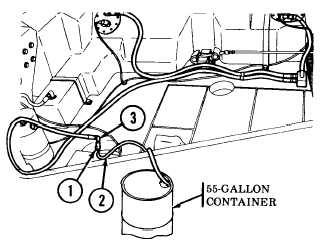
A
Connect battery ground cables.
B
Attach adapter (1) and fuel extension (2) to main fuel line at
quick-disconnect (3).
C
Place free end of fuel hose extension (2) into a clean 55-gallon
container.
TA57981