|
| |
TM 9-2350-287-34
11-4. HYDRAULIC ACTUATOR REPAIR.
This Task Covers:
a. Disassembly
b. Cleaning, Inspection, and Repair
c. Assembly
Initial Setup:
Tools/Test Equipment:
Grease (Item 11, Appendix B)
Combination wrench set (Item 7,
Hydraulic fluid (Item 13, Appendix B)
Appendix D)
Rag (Item 17, Appendix B) (as required)
Drain pan (Item 12, Appendix D)
Overhaul kit (Item 73, Appendix H)
General mechanic's tool kit
(Item 19, Appendix D)
Personnel Required: Two
Materials/Parts:
Equipment Conditions:
Cap and plug set (Item 4, Appendix B)
Hydraulic actuator removed (refer to
Corrosion preventive (Item 7, Appendix B)
TM 9-2350-287-20-2).
Dry-cleaning solvent (Item 9, Appendix B)
a.
DISASSEMBLY
WARNING
Hydraulic fluid can cause skin rash. Wear gloves when handling hydraulic fluid. If it
gets on skin or clothing, wash with soap and water.
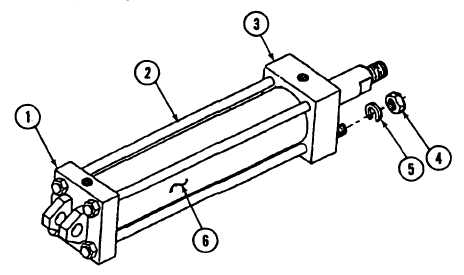
1.
Place drain pan under hydraulic actuator (6), and remove end cap (1) from actuator (6). Drain hydraulic fluid into drain
pan.
2.
Remove four nuts (4) and lockwashers (5) from end cap (1) and gland (3). Discard lockwashers.
3.
Remove four tie rods (2) from gland (3).
11-12
|