TM 9-2350-287-10
TRACK MAINTENANCE (continued)
8.
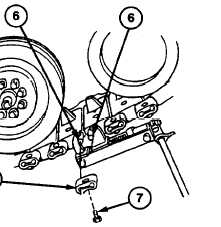
Install one end connector (4) on two track link pins (6) on outside of track.
9.
Remove two track connecting fixtures and logs or rocks from track.
10. Tap two end connectors (4) with hammer to seat end connectors (4) against track.
11. Install four bolts (7) in four end connectors (4).
12. Adjust track tension (p. 3-29).
13. Mark replaced end connectors (4).
14. Drive vehicle at a speed not to exceed 10
miles per hour for a short distance,
alternating right and left steers.
15. Stop vehicle and visually inspect for any
end connectors that may have shifted. If
any end connectors have shifted,
reposition. Tighten end connector bolts
(7) that have been repositioned. Notify
Unit maintenance to torque bolts between
380 and 420 ft-lb (518 and 570 N•m) wet
at earliest opportunity.
NOTE
Notify Unit maintenance to
retorque end connector bolts after
50 miles.
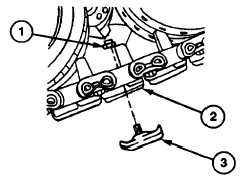
Removing Track Shoe Pads
Using breaker bar and 15/16-inch socket,
remove nut (1) and track shoe pad (3) from
track shoe (2).
Installing Track Shoe Pads
NOTE
When installing track shoe pads, avoid creating
a “hill and valley” profile. Isolated high points will
wear quickly. Adjacent pads should be the same
height. Do not install pads in an irregular profile;
shuffle pads to maintain a smooth profile.
1.
Install track shoe pad (3) and nut (1) on track shoe (2). Tighten nut (3) using
breaker bar and 15/16-inch socket.
2.
Notify Unit maintenance to torque nut (1) between 110 and 150 ft-lb (149 and
203 N•m) at earliest opportunity.
Change 1
3-38.1/(3-38.2 blank)