TM 9-2350-261-20-2
R E P L A C E R E A R M A I N W I R I N G H A R N E S S ( M 1 0 6 4 O N L Y)
DESCRIPTION
This task covers:
Remove (page 12-118. 1).
Clean, Inspect, and Repair (page 12-118.11).
Install (page 12-118.11).
INITIAL SETUP
Tools:
General Mechanics Tool Kit (Item 30, App D)
Multimeter (Item 43, App D)
Materials/Parts:
Insulation tape (Item 26, App C)
Twine (Item 57.1, App C)
Grommet (4)
Lockwasher (36)
Self-locking nut (21)
Personnel Required:
Unit Mechanic
References:
See your -10
Equipment Conditions:
Engine stopped (see your –10)
Carrier blocked (see your -10)
Battery ground lead disconnected (page 13-2)
Ramp lowered (see your -10)
Rear floor plate removed (page 24-38)
REMOVE
4.
1.
2.
3.
N O TE
Tag leads before removal.
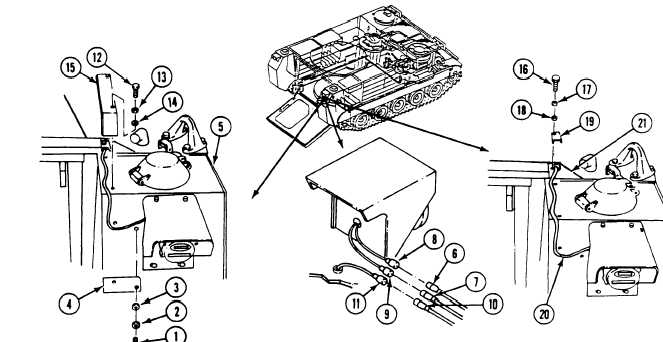
Remove two screws (1), lockwashers (2),
washers (3), and harness guard (4) from top
5.
of right fuel tank (5). Discard lockwashers.
Disconnect circuit 23 and 24 leads (6 and 7)
from right tail light leads (8 and 9).
6.
Disconnect circuit 31
transmitter lead (11)
lead (10) from fuel
on right fuel tank (5).
Remove two screws (12), lockwashers (13),
washers (14), and harness bracket (15) from
top of right fuel tank (5). Discard
lockwashers.
Remove screw (16), lockwasher (17), washer
(18), and harness guard (19) from top of rear
hull. Discard lockwasher.
Pull harness (20) through hole in rear
plate (21).
Change 2
12-118.1
G O T 0 N E X T P A G E