TM 9-2350-261-20-1
D R A I N F U E L C O M P A R T M E N T ( M 1 2 5 A 2 A N D M 1 0 6 A 2 O N L Y )
I N I T I A L S E T U P
Tools:
References:
General Mechanics Tool Kit (Item 30, App D)
See your -10
Materials/Parts:
Equipment Conditions:
Wiping rag (Item 61, App C)
Engine stopped/shutdown (see your -10)
Suitable size container
Carrier blocked (see your -10)
Battery ground lead disconnected (page 13-2)
Personnel Required:
Unit Mechanic
D R A I N
1.
2.
3.
4.
5.
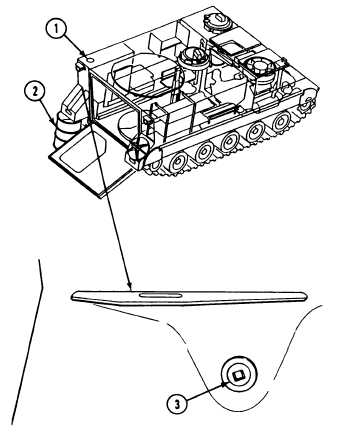
Open fuel filler combat cover (1). Remove fuel
filler cap (see your -10).
N O T E
Fuel tank capacity is 95 gallons.
Place a suitable size container (2) directly be-
hind earner and under left rear fender.
W A R N I N G
Fuel flowing over a metal
l s u r f a c e
causes
static
electricity. This will cause a
spark unless the surface is
grounded.
N O TE
Use wiping rag to wipe up any spilled fuel.
Make sure metal container (2) is making
metal-to-metal contact with carrier so that
there is a good ground.
Remove drain plug (3) from left rear bulk-
head above fender, and drain fuel.
Apply sealing compound to cleaned threads of
drain plug (3). Install plug in left rear bulk-
head.
6. Install fuel filler cap. Close filler combat cover
(1) to keep dirt out of fuel compartment.
F O L L O W - T H R O U G H S T E P S
1. After maintenance has been performed, fill
Z. Connect battery ground lead (page 13-2)
fuel compartment (see your -10).
END OF TASK
6-77